
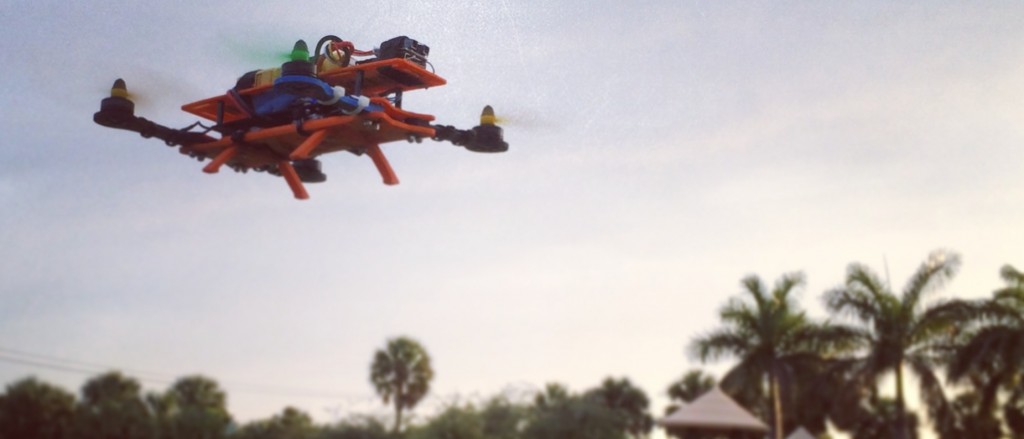
The past few years have seen impressive changes in the quadrotor field, both in availability of powerful and sophisticated components for hobbyists and in the quality of research at various universities. After recently discovering an interesting looking 3D printable quadrotor frame on Thingiverse called Hovership, I decided it was high time to have a go at building my own.
A few parts needed for the build were difficult to source, so I have included a bill of materials below. The Hovership Thingiverse page has additional information regarding components that can be used, but the list isn’t complete if this is your first RC build. Specifically, the Thingiverse page has no information about radio, receiver or transmitter to use. I don’t claim that the setup listed below is optimal, but it should represent a complete system if you’re starting from nothing. If you’re planning to build your own Hovership, I recommend taking a look at the build guides and checking out the Tau Labs open source flight control software project as good start points. If you’re planning to use the Sparky microcontroller, it’s also worth checking out this blog from the developer of the board. That said, here’s the list of components that I used to build my own Hovership:
NOTE:If you’re building this like I did, you probably want to buy a FrSky D4R-II 4 channel receiver instead of the D8R-II plus. The D8R-II plus doesn’t support PPM mode out of the box to communicate with the Sparky and you’ll have to flash the firmware if you want to use it that way. If you buy the D4R-II instead, it comes with PPM support out of the box and weighs about 10g less than the D8R-II plus or the D8R-XP.
With these components ordered, it was time to start the build:
Step 1: Print frame
The first step of the build process is to get the frame printed. All of the design files and print parameters (% infill, etc.) can be found on the Hovership Thingiverse page: http://www.thingiverse.com/thing:251002

Step 2 (while you’re waiting for parts to arrive): Assemble frame to make sure all 3D printed parts fit together correctly

Step 3: Install motors

Step 4: Install ESCs
When you’re ready to connect your ESCs to your motors, you need to pay attention to the direction that each motor spins. If you’re building a Hovership, the front left motor and rear right motor should spin clockwise, while the front right and rear left motors should spin counterclockwise. The easiest way to figure this out is to just pick your favorite ESC wires, solder them to the motor wires, connect the ESC to the Sparky microcontroller, connect the ESC to a +12V power supply and manually toggle the output to turn the motor on in the Tau Labs GCS. If it spins the wrong way, pick any two ESC/motor wires and reverse them.


Once you have all of your motors soldered to the ESCs and spinning the right way, you need to connect the ESCs to your power source somehow. You can use a power distribution board, or just solder the ESC power and ground wires to your battery connector. There’s a great video explaining how to do so here. To save on weight, and since I didn’t have any bullet connectors, I decided to solder the ESC power directly to the battery connectors instead of using the power distribution board.
At this point you also need to remove the middle red wire from three of the four ESC servo motors so that only one ESC is powering the Sparky. Someone explained why this is needed in the Tau Labs IRC (chat.freenode.net, #taulabs), but I’ve since forgotten (I think it had to do with overheating the other ESCs unnecessarily). If someone would like to clarify, please feel free to leave a comment on this post!


Step 5: Install Microcontroller (Sparky) and start connecting wires
At this point your motors are wired to your ESCs and your ESCs are ready to connect to a battery. Next up, mount the microcontroller onto the frame and start connecting the ESC servo cables to the controller board. You can find more information about wiring ESCs to a Sparky here.

Note: If you bought a D8R-II Plus receiver like I did, you’ll need to make sure it’s running the D8R-XP firmware to enable PPM communication with the Sparky. You can find instructions on how to do this here and here. I used an Adafruit FTDI Friend to accomplish this.
For the D8R-II plus to run in PPM mode with the D8R-XP firmware, you will need to put a jumper across channels 3-4 and then connect channel 1 to the Sparky. The D8R-II plus has three symbols for each channel: -, + and _|-|_ (excuse my lame ASCii art). The – goes to 0 on the Sparky, the + goes to +5V on the Sparky (you’ll need bridge the 5V selector on the Sparky board with a bit of solder if you didn’t do that already) and the _|-|_ goes to Rx.

This is a good time to bind your transmitter and receiver together if you haven’t done that yet. You can find instructions for doing so here. I also soldered a 3-pin right angle header onto the Sparky to make these cables easier to connect as well.

Step 6 – figure out how to charge your new LIPO batteries
This post on the Hobbyking forum was helpful in determining how to get the batteries charged. Specifically, the comments by user emsnaz were helpful in figuring out what settings to use.
tl;dr: I charge my 1500mAh 35C 3S on the balance setting at 1.5A 11V (3 cell). For more information on LiPo batteries, I recommend reading this.
Step 7 – fire up the Tau Labs GCS and run the Radio Wizard and Vehicle wizard.
Follow the steps described in peabody124’s ‘Tau Labs Getting Started‘ video.
Step 8: Calibrate your ESCs
Follow the ESC setup tutorial found here.
Step 9: Test flight!
Congratulations, if you’ve reached this point you now have a quadrotor that is ready to test. Let’s go crash fly it!

This video below is actually technically flight #6 or so, but this is the first flight that lasted more than 10 seconds which didn’t also result in a crash landing.
I’ll conclude this post with a huge thank you to everyone in the Tau Labs community who helped me get this thing up and flying!
Step 10: Keep hacking at it
I’m going to use this section to track updates as I continue to learn more about the quad and make changes to it.
5/13/2014 update
Here’s what I’ve learned, what additional parts I’ve ordered and other general updates:
- I didn’t anticipate that the 7mm grey vibration balls used to hold the base of the frame to the middle frame would become a consumable. I’ve lost 3 or 4 so far during various crashes because they’re difficult to locate in the grass. I recommend ordering a handful of spares and/or painting them a bright color.
- Mark your motor arms to indicate which motor gets installed on each arm, e.g. (motor 1, motor 2, motor 3 or motor 4). This will make it easier to figure out which propellers (CW or CCW) to install on which motor without having to power up the quad. Also mark your frame base, middle frame and upper frame to indicate which way should face forward. I had a crash yesterday which popped the mid and upper frame off the base, reinstalled the middle frame on backwards and promptly crashed again because the microcontroller and I had different ideas of which way was forward. I just used a sharpie to mark a small arrow on the front of each piece and problem solved.
- Other parts to consider buying which are not listed in the B.O.M. above (I haven’t received or tested any of these yet, but they’re all inbound): UBEC to increase flight time by powering the microcontroller more efficiently, GPS to make the airframe easier to fly, low battery indicator to know when to land and swap the battery, M5 nylock nuts to replace the RCX bullet heads which keep popping off during crashes (might break more propellers, but at least I won’t loose the bits that hold them on!).
5/24/2014 update
The biggest improvement in flight control and stability came this week after tuning the Hovership. Tau Labs developer peabody124 provided the settings for his Hovership, which I tested and found to be a huge improvement over the default settings. These settings are seen below.

After testing these values, I tried running the Tau Labs autotune which worked quite well. The values were updated a bit from peabody124’s settings and the Hovership is now much more stable and easy to control than it was originally. I’ve also attached a Mobius action camera to the Hovership (sitting on moongel) and have been testing video capture. The resulting images and video are far from perfect, but I’m quite happy with them at this point. I’ve included a sample video below, but take note that this video was taken using propellers that are quite beat up from crashes during the learning process and as a result are obviously not balanced.

very comprehensive, I found learning the power chain involving the ESCs most confusing, so it was good to see you go through that as well 🙂
Thanks a lot for writing this detailed log of your build. I put mine together a bit differently but your breakdown help me be sure I wasn’t going to mess up my build.
I’m unable to find the sparky micro controller for sale any where. I’m just wondering for clarification if it is the same micro controller as can be found here? http://sparky.zacharypower.com/ or if I’m barking up the wrong tree.
Thanks for this blog post though it really gave me the confidence to give this project a crack 🙂
Hello Joe, the Sparky is available for sale directly from the designer of the controller. His blog is here: http://buildandcrash.blogspot.com/ and he can also be found on Twitter as @peabody124.