
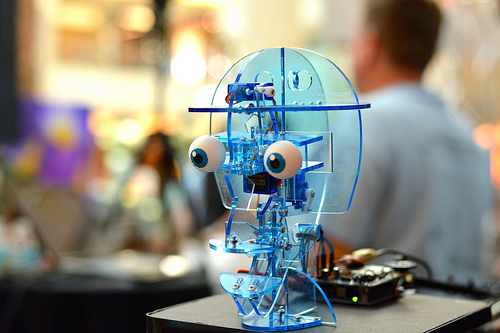
My adventure with StarBots started in 2012 when I visited the first Orlando Mini Maker Faire and saw Pat Starace’s fantastic animatronic creations on display. The singing display was very impressive and was easily one of my favorite displays at the event. Luckily, Pat has branched out into making animatronic kits after a very successful Kickstarter and I’m happy to say that the kit is quite a lot of fun.
The StarBot kit is controlled simply enough by a Sparkfun Joystick Shield. This shield allows the eyes and mouth to be controlled in real time and also allows a sequence of controls to be recorded and played back afterwards. This was all great, but I wanted a way to programmatically trigger audio playback and have a way to synchronize movement of the eyes and mouth with the audio. After a bit of research, I decided to use the Adafruit Wave Shield for Arduino to accomplish this and it worked quite well.
The first task was to assemble the StarBot kit, solder the joystick shield, wire everything up per the instructions and to stack the joystick shield onto the provided Arduino which came preloaded with the StarBot software. After the base StarBot kit was completed and verified to be functional, the next step was to assemble the wave shield and load a sample wave file onto the provided SD card as described in the Adafruit wave shield tutorial.
Once the wave shield was finished, it was time to start tying everything together. I will add a disclaimer here that the process described below is far from optimal and I wound up reinventing the wheel a bit since I was under a very tight time constraint (needed the StarBot ready for an education outreach event) and didn’t have access to the StarBot source code when I was working on this project. That said, there are some technical details (specifically about limitations of servo control through the wave shield) that I thought were worth sharing even if this solution is a bit of a hack. Note that on the wave shield, audio is played asynchronously, so you can issue a command to start playing a sound and then conveniently launch right into sending servo commands to give the appearance of synchronized movements between the StarBot and the wave shield.
Step 1: Basic control of the StarBot through wave shield
Three stumbling blocks in communicating with the StarBot through the wave shield were:
- The default I/O pins used by the StarBot are used by the wave shield for communication with the SD card. I wound up moving the StarBot I/O to pins 14, 15 and 16.
- The wave shield causes a timer conflict with the default Arduino servo library. This conflict is documented on the Adafruit forums as well. The resolution to this was to download the ServoTimer2 Arduino library and use that instead.
- The ServoTimer2 library takes a parameter of pulse width instead of degrees as the default servo library uses. I found someone had already solved this issue by defining a function to convert degrees to microseconds and added this to the top of the file header.
Step 2: Make it sing
Once the StarBot was functioning with the wave shield, the question was how to synchronize movements to coincide with the audio that the wave shield would be playing. I decided that the fastest way to do this would be to combine the joystick shield with an Arduino timer and then use the serial output to record the timing sequence as I manually puppeteered the StarBot in time with the audio to be played. I’ll make a quick note here that Sudar Muthu’s joystick shield library was quite helpful in helping to debug the shield and get it working as needed.
The Arduino sketch I used for this purpose was modified from Sparkfun’s sample sketch for the shield and can be found on Github here. When you run this code and use the joystick to control the starbot, the serial window will log the movement sent along with a timestamp and the output will look like:
eyesXleft 11430
eyesXreturn 11746
eyesXright 11767
eyesXreturn 11961
eyesXleft 11992
eyesXreturn 12186
eyesXright 12237
This serial output means the following occurred: The eyes looked left along the x-axis at time 11430, then returned to their center position at 11746. The eyes then moved right along the x-axis at 11767 and returned to their center position at 11961.
My quick hack way to turn this into control commands for the StarBot was to bring this log into Excel and convert it into servo commands with delay statements representing the time between serial statements. The first step is to determine the time elapsed between commands so we know how long to hold each command for and how long to delay between commands. Doing this would result in a series of Arduino statements that could be loaded into the wave shield code like this:
The delay(790) is just a delay to wait until the song starts since it’s not immediately at the beginning of the wav file. After the initial delay, it sends a command to move the eyes to 160 degrees along the x-axis (maximum x-angle left), then to center the eyes and goes on from there.
The only other trick was to edit the play() function in the Adafruit wave shield example to call the motor commands after the wave.play() command.
You can find the full code for the wave shield + motor movement control of StarBot on github here. When you’re all done, you should get a very awesome StarBot that sings along as seen in the video below!
And finally, the end result of this entire project was that I was able to bring the singing StarBot to the annual Scripps Science Education Saturday and use it to get kids interested in science & engineering. Mission accomplished!
Pingback: StarBots Animatronic Kits: Another Kickstarter Success Story | MAKE