
If you have read any technology blog in the past few months, chances are good that you have seen an ever increasing number of blog posts about people hacking their Xbox Kinect to do all kinds of really cool stuff. If you are like me, you found yourself thinking ‘I have got a really cool idea to do ________ with my Kinect, I should see what this is all about!’. Problem is, there is no definitive entry point to developing software using the Kinect.
The goal of this blog post is to provide a general overview of the tools available and where you can go to get started. The information below represents my experiences on a Windows XP SP3 platform, using Visual Studio 2008 for an IDE. If you are looking for OS X or Linux help, sorry! Maybe some of the information will still be relevant. Let’s get started:
Why don’t I just use a USB camera?
There are two main advantages to using the Kinect:
- Depth sensor: the Kinect has a fancy pants IR depth sensor built in which is great for doing any kind of depth tracking and/or 3D stuff.
- Brains (if you use the OpenNI library with NITE middleware): One of my favorite things about working with the Kinect thus far is how quickly and easily you can write a neat application. Normally you would have to worry about lighting, background corrections and all kinds of other environmental parameters that aren’t much fun to deal with. First time out of the box, I had my Kinect tracking my movement in a room with zero lighting while it was facing a giant mirror with no complicated code. If you ask me, that’s impressive.
Choosing your development tools
There are currently two main development tools which you can use to work with the Kinect:
- OpenKinect (http://openkinect.org/)
- OpenNI + NITE (http://www.openni.org/)
Here is my general impression of the two given my extremely limited exposure time with these libraries:
OpenKinect is great if you want to access the raw data from the image sensors and write your own algorithms basically from scratch. With OpenKinect you can drive the Kinect motors and access the data streams coming from the image sensors. There are also four microphones on the Kinect, but as far as I know the OpenKinect driver doesn’t support data acquisition from them (yet).
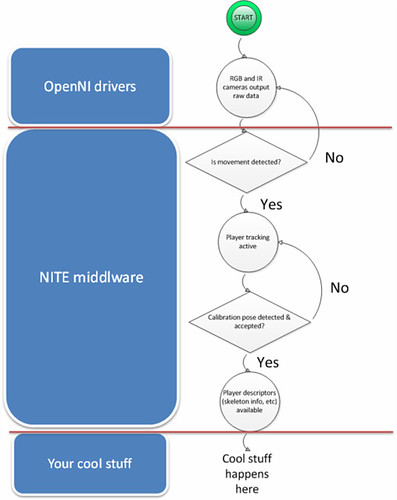
OpenNI + NITE is great if you want to hit the ground running and do not really care too much about the internals of the provided tools. OpenNI has an advantage as of this writing, because Prime Sense has given developers free access to some functions which have not currently been developed in OpenKinect. For example, OpenNI works with the NITE tools which provide skeletal information and hand, gesture and joint tracking. If you want to do these things with OpenKinect right now, you will have to implement them yourself. Here is how I understand the OpenNI + NITE toolset to work (I’ve put this together from my limited experience with the code, so it’s quite possibly wrong):
I am sure I have oversimplified, as there are also potential licensing issues to discuss, but the 10,000 foot view will have to suffice for now. At this point I will assume you have chosen a tool set (or plan to test both), so let us move on.
The USB Device Driver
The first thing you are going to need is a USB Device Driver. Without one, all you will see is an unrecognized device that you system cannot communicate with. As of this writing, there are two device drivers, each one specific to the programming tools that you would like to use:
- OpenKinect (http://openkinect.org/wiki/Getting_Started_Windows). The Wiki is pretty well detailed, so I’ll leave it at that.
- OpenNI/NITE (http://www.openni.org/downloadfiles/30-openni-compliant-hardware-binaries). This route is a little more complicated right now, mainly due to lack of comprehensive documentation (or maybe I just didn’t RTFM). You’re going to need the following files: OpenNI device driver, OpenNI binaries, NITE device driver, NITE binaries. The specific files that I used are named: OpenNI-Bin-Win32-v1.0.0.25.EXE Sensor-Bin-Win32-v5.0.0.25 .exe, SensorKinect-Win32-5.0.0.exe, NITE-Bin-Win32-v1.3.0.18.exe
That’s it. Once you have your favorite toolset downloaded and installed, you should see the Kinect listed in your Windows device manager. If you get that far, you can poke around in the demos folders to get a feel for what you can do.
OpenFrameworks
As a quick aside, I recommend checking out OpenFrameworks forums. There are quite a few people who have been working on OpenFrameworks extensions for both OpenKinect and OpenNI/NITE. The code I’ve been working on started out as an OpenFrameworks OpenNI/NITE project that someone posted there. This is a good place to poke around if you want to see a collection of OpenFrameworks demos:
http://www.openframeworks.cc/forum/viewtopic.php?f=10&t=5125&hilit=kinect+driver
The Project
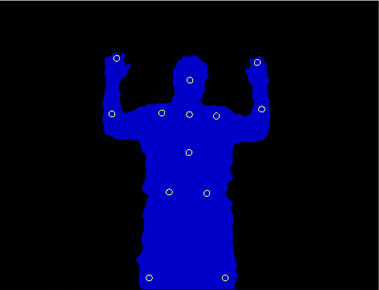
So all this information is great, but what can you do with these tools? Here’s what I cooked up: a combination Lynxmotion robot arm controller and 2D live motion ‘puppeteer’ demo. Before getting into a project, I would suggest poking around in the ‘demos’ folders included with both OpenNI and OpenKinect. This will give you a rough idea of where to start (at least it did for me). If you’re using OpenNI + NITE, playing with the demos is also going to teach you that most of the useful data requires users to perform what is called a calibration pose. I didn’t find this pose documented anywhere officially, but a bit of Googling revealed it to be be a pose where the user holds both arms at right angles up from the torso and also the arms bends up at the elbows (think of Beavis and Butthead). It looks something like this:
After starting the software and performing the calibration pose, the NITE middleware starts providing X,Y,Z coordinates for all of the user joints (head, hands, elbows, shoulders, torso, hips, knees and feet). I’m sure it does many other sophisticated things, but that was all the information I needed for my demo program.
After a bit of a refresher course on basic geometry, I had a simple system working to determine the angles between various body parts based on joint coordinates. After that point, all it took was a few calls to OpenFrameworks/OpenGL functions to rotate robot bodyparts and send signals to the Lynxmotion arm over a serial port. Here’s the end result:
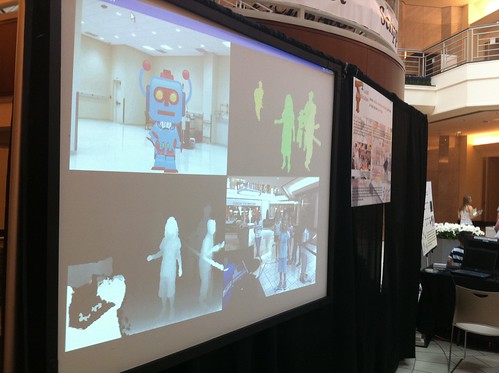
This project was also on display at the 2011 Scripps Florida Science Education Saturday at the Gardens Mall in Palm Beach, as seen in this video:
The Code
I have uploaded the code used for this demo (minus the robot graphics which were purchased from a stock art site) and it can be downloaded in a ZIP file here (~32 MB):
http://www.jiggywatts.com/files/projects/Kinect/ofxONI_notYetAddon_sampleROBOT.zip
The End
Thanks for reading this blog post, I hope it has been helpful! If you found any technical errors, please contact me (@Kabong on Twitter) so I can correct them. Happy hacking!
As a bonus, here are some slides from a presentation I made about this project at the totally awesome, first ever South Florida Hack & Tell (http://hackandtell.org/):

Pingback: KinectoBot (noun):A friggin' awesome robot - KinectHacks.net